

Water damage can happen because of burst pipes, leaking roofs, overflowing appliances, storms, plumbing failures, or other unexpected problems. When water enters a property, quick action can reduce structural damage, protect belongings, and support a safer recovery for everyone.
A thorough restoration plan is important because Professional Complete Guide to the water Damage Restoration Process explains how a property can move from an unexpected water emergency toward proper cleaning, drying, repair, and recovery. Water damage restoration is not simply about removing visible water from floors. It involves identifying the source, assessing affected materials, extracting standing water, controlling moisture, drying structural components, cleaning affected areas, addressing potential contamination, and completing necessary repairs.
Understanding the Water Damage Restoration Process
Water damage restoration is a structured process designed to return an affected property to a safe and usable condition. The exact steps can vary according to the amount of water, the source of the intrusion, the materials affected, and whether the water is clean or contaminated. Professional restoration teams generally begin by assessing the situation before determining which restoration procedures are appropriate.
The IICRC identifies professional water damage restoration as a process involving safety, inspection and documentation, mitigation of further damage, cleaning and drying, and completion of restoration and repairs. These principles help restoration professionals organize the work rather than treating only the visible symptoms of water damage.
Step 1: Identify and Stop the Water Source
The first priority is determining where the water is coming from. A broken supply line, overflowing appliance, plumbing leak, roof problem, damaged drainage system, or storm-related intrusion may continue adding moisture to the property if the source is not controlled.
Stopping the source helps prevent additional water from entering the building. Property owners should only shut off water or electricity when it is safe to do so. If water has reached electrical equipment, outlets, appliances, or wiring, professional assistance may be necessary before entering the affected area.
Restoration professionals also look for less obvious moisture sources. Water can travel underneath flooring, behind walls, through insulation, and into subfloors. Simply removing visible water without addressing hidden moisture can leave conditions that contribute to continuing deterioration.
Step 2: Inspect and Assess the Damage
After the water source has been controlled, the affected property needs a careful inspection. Professionals evaluate which rooms, materials, furnishings, and structural components have been exposed to moisture.
A proper assessment may include visual inspection and moisture measurements. Technicians can examine flooring, drywall, ceilings, baseboards, cabinets, insulation, subfloors, and other materials to determine the extent of the problem.
Documentation is also important. Photographs, moisture readings, affected-area measurements, and notes about damaged materials can help establish the scope of restoration work. This information may also be useful when communicating with property owners, contractors, or insurance representatives.
Step 3: Determine the Type and Extent of Water Damage
Not every water intrusion presents the same conditions. Clean water from a controlled source can require a different response than water containing sewage or other contaminants. The condition of the water, how long materials have been wet, and where the water has traveled all influence the restoration approach.
Contaminated water requires additional precautions because affected materials may present biological or other hazards. EPA guidance notes that contaminated-water situations can require appropriate personal protective equipment and containment, and professional expertise may be needed.
The goal is to understand the problem before selecting cleaning, extraction, drying, removal, or repair procedures.
Step 4: Remove Standing Water
Once the area has been assessed, standing water can be removed using appropriate extraction equipment. Professional water extraction may involve powerful pumps, extraction units, wet vacuums, or specialized equipment depending on the amount and location of water.
Removing standing water quickly is important because prolonged moisture exposure can increase the likelihood of secondary damage. Water can weaken materials, affect flooring, damage furniture, and migrate into areas that are not immediately visible.
However, extraction is only one part of restoration. A property can appear dry while moisture remains inside drywall, flooring assemblies, cabinets, insulation, or other materials. That is why professional drying and moisture monitoring are essential parts of the complete restoration process.
Step 5: Begin Structural Drying
After standing water has been extracted, technicians focus on removing remaining moisture. Air movers, dehumidifiers, and other drying equipment can help increase evaporation and reduce humidity.
The IICRC explains that drying involves removing excess moisture from materials through appropriate drying principles, including evaporation, dehumidification, ventilation, and temperature management.
Professional drying should not simply involve placing fans in a room and leaving them running. Technicians need to monitor moisture levels and determine whether materials are actually approaching appropriate dry conditions.
EPA guidance for clean-water damage emphasizes prompt drying, with certain materials ideally dried within approximately 24 to 48 hours to help reduce mold-development risks. However, this is a guideline rather than a guarantee that mold will or will not develop.
Professional Complete Guide to the Damage Restoration Process in Round Rock, TX
For property owners dealing with water damage in Round Rock, TX, understanding the complete restoration sequence can make an unexpected emergency easier to manage. Professional Complete Guide to the water Damage Restoration Process in Round Rock, TX should include more than water extraction. A complete approach considers the source of moisture, affected building materials, structural drying, cleaning, potential microbial concerns, repairs, and final evaluation.
Local property conditions can vary considerably, so restoration work should be based on the actual condition of the affected building rather than a one-size-fits-all procedure. Legacy Water Restoration can help property owners understand the restoration stages and determine what areas require attention after a water-related incident.
Step 6: Monitor Moisture During Drying
Moisture monitoring is one of the most important parts of professional restoration. Technicians can take readings from affected and unaffected materials to compare moisture conditions and establish drying progress.
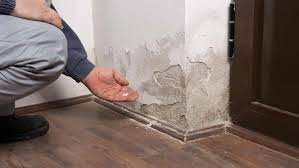
Monitoring helps identify areas that may still contain trapped moisture. For example, a wall may look dry on the surface while moisture remains behind the drywall. Similarly, flooring can appear normal while the subfloor underneath remains damp.
The objective is not merely to make surfaces feel dry. The restoration team should verify that affected materials have reached appropriate moisture conditions before the drying equipment is removed.
Step 7: Clean and Sanitize Affected Areas
Once excessive moisture has been removed, cleaning becomes an important part of restoration. Water can carry dirt, debris, microorganisms, and other unwanted substances into a property.
Cleaning methods depend on the type of water and the materials involved. Hard surfaces may be cleaned using appropriate detergents and methods, while porous materials may require specialized evaluation or removal when they cannot be effectively restored.
EPA guidance states that mold control depends heavily on moisture control and recommends cleaning mold from appropriate hard surfaces and thoroughly drying them. Porous materials affected by mold may sometimes need to be discarded because contamination can penetrate areas that are difficult to clean completely.
Step 8: Address Mold and Microbial Concerns
Moisture problems can create conditions that support microbial growth. If water damage has remained untreated, visible mold, musty odors, staining, or other indicators may require additional assessment.
Mold remediation should not be confused with simply spraying a product onto a surface. Proper remediation involves identifying and correcting the moisture problem, evaluating affected materials, controlling contamination, cleaning or removing materials as appropriate, and verifying that the problem has been addressed.
The IICRC S520 provides professional guidance for mold remediation, including assessment, safety, containment, structural remediation, contents remediation, and post-remediation verification.
Step 9: Evaluate Damaged Materials
Not every water-damaged material needs to be removed. Restoration professionals evaluate whether materials can be successfully cleaned and dried or whether replacement is necessary.
For example, certain drywall may be dried in place when conditions are appropriate, while swollen or deteriorated drywall may require removal. Flooring, insulation, cabinetry, carpeting, wood, and upholstered furniture can all respond differently to moisture.
EPA guidance similarly recommends evaluating individual materials based on their condition, moisture exposure, and ability to be dried or cleaned effectively.
This evaluation helps prevent unnecessary removal while ensuring severely damaged materials are not left in place when they cannot be properly restored.
Step 10: Restore and Repair the Property
After extraction, drying, cleaning, and material evaluation are complete, the final restoration stage can begin. Depending on the severity of the damage, this may include replacing drywall, repairing flooring, repainting walls, restoring cabinets, replacing insulation, repairing trim, or completing other construction work.
The repair stage should address the consequences of the water damage rather than hiding them. For example, painting over a damaged surface before moisture problems have been resolved can create additional problems. Proper restoration requires the underlying moisture issue to be addressed first.
A complete restoration project therefore combines mitigation, drying, cleaning, and appropriate repairs to help return the property to its pre-loss condition.
Why Fast Water Damage Response Matters
Time is an important factor after water enters a building. The longer porous materials remain wet, the more difficult restoration can become. Moisture can move into building assemblies, damage finishes, increase odors, and create conditions favorable to microbial growth.
EPA resources emphasize fixing water problems quickly and drying affected items completely. Their guidance also notes that wet materials may require different responses depending on their composition and the degree of contamination.
For this reason, property owners should avoid unnecessary delays when significant water damage occurs. Prompt assessment can help determine what needs to happen next.
Common Mistakes to Avoid After Water Damage
One common mistake is focusing only on visible standing water. Hidden moisture can remain underneath floors, inside walls, and beneath cabinets. Another mistake is removing drying equipment before moisture levels have been properly evaluated.
Property owners should also avoid assuming that every water-damaged item should automatically be discarded. Some materials may be recoverable with appropriate professional cleaning and drying, while others may require replacement.
Another important consideration is contaminated water. Fans and other equipment should not automatically be used before determining whether the water is sanitary. EPA guidance specifically warns that contaminated-water situations require different safety considerations.
Choosing a Professional Water Damage Restoration Company
When selecting a restoration company, property owners should consider experience, communication, documentation practices, equipment, safety procedures, and familiarity with recognized restoration standards.
A professional company should be able to explain the restoration process clearly, identify the source of the problem, describe the drying strategy, communicate what materials may require removal, and document progress.
Legacy Water Restoration can serve as a resource for property owners who need guidance following water damage. A clear restoration plan can help property owners understand what is happening at each stage instead of simply seeing equipment placed throughout the affected property.
Final Thoughts on the Complete Restoration Process
Water damage restoration is a multi-stage process that requires more than removing visible water. From stopping the source and assessing affected areas to extraction, structural drying, cleaning, moisture monitoring, mold considerations, material evaluation, and repairs, every stage contributes to a complete recovery.
The Professional Complete Guide to the Damage Restoration Process demonstrates why professional restoration should focus on both visible and hidden moisture. Proper assessment and drying can help reduce secondary damage and provide a stronger foundation for repairs.
For property owners in Round Rock, TX, Legacy Water Restoration can help explain the steps involved in recovering from water damage. Acting promptly, documenting the condition of the property, controlling the moisture source, and ensuring affected areas are thoroughly dried are important parts of an effective restoration strategy.